15 Tongue and Groove Ceiling Porch Ideas For A Stunning Look
Look up at your porch ceiling right now. Is it just a boring slab of plywood or peeling vinyl? You deserve better than that. We spend so much time worrying about the decking boards under our feet that we often forget about the fifth wall above our heads.
Installing a tongue and groove ceiling porch upgrade is the absolute best way to add instant character and value to your home. It transforms a basic outdoor space into a luxury outdoor living room.
I have seen countless porches go from drab to fab with just this one change. You do not need to be a master carpenter to appreciate the warmth and texture natural wood brings to the table.
15 Tongue and Groove Ceiling Porch
Whether you want a cozy cabin vibe or a sleek modern look allows you to customize the space exactly how you want it. Let us explore some killer ideas that will make your neighbors jealous.
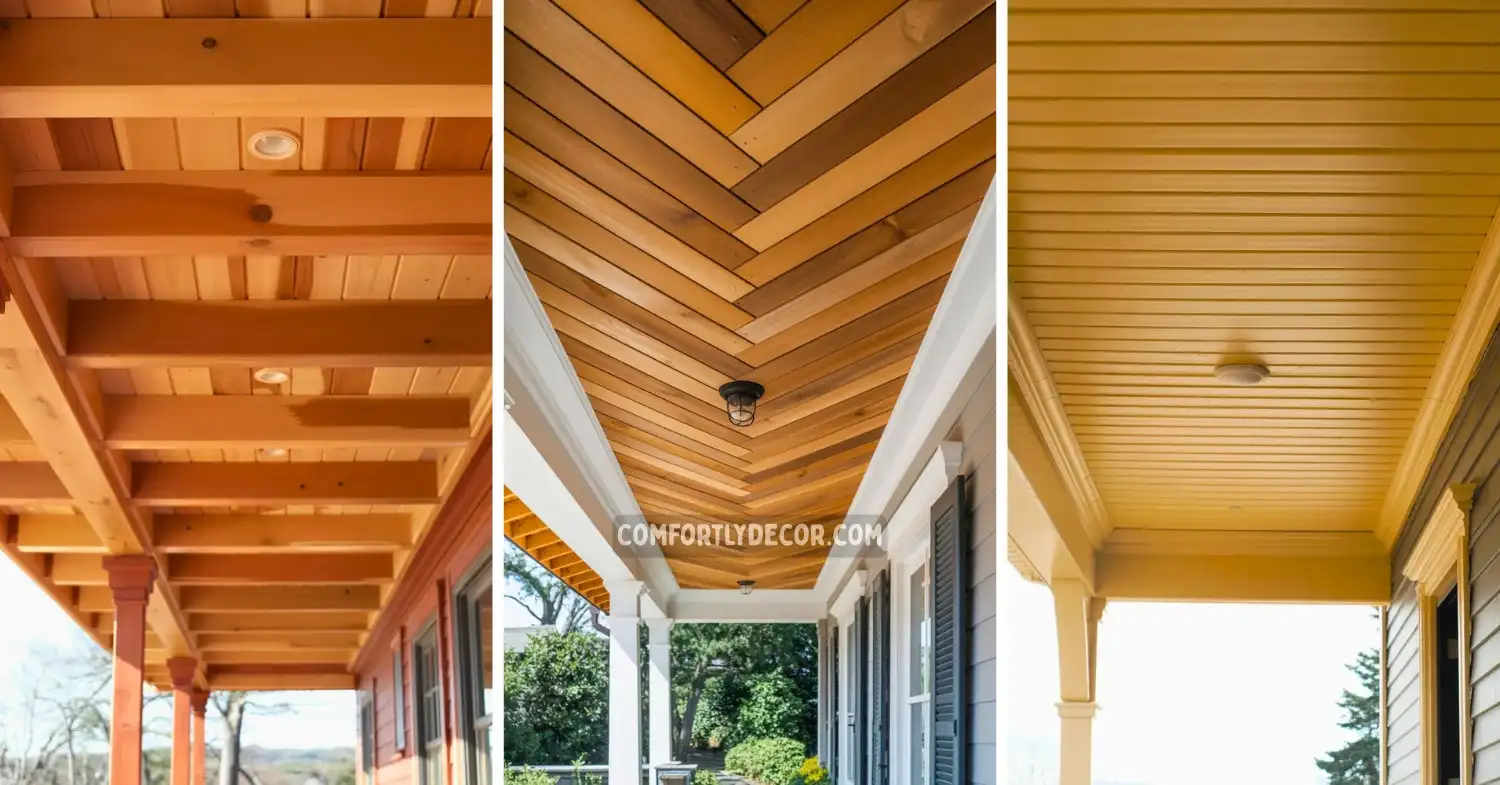
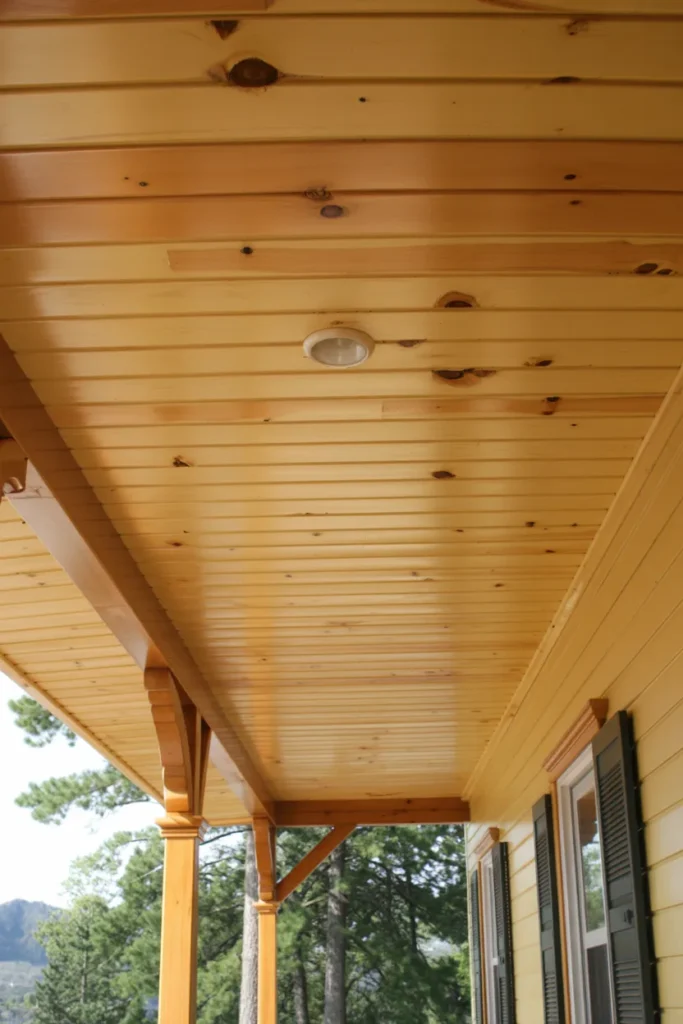
1. Classic Clear Cedar Warmth
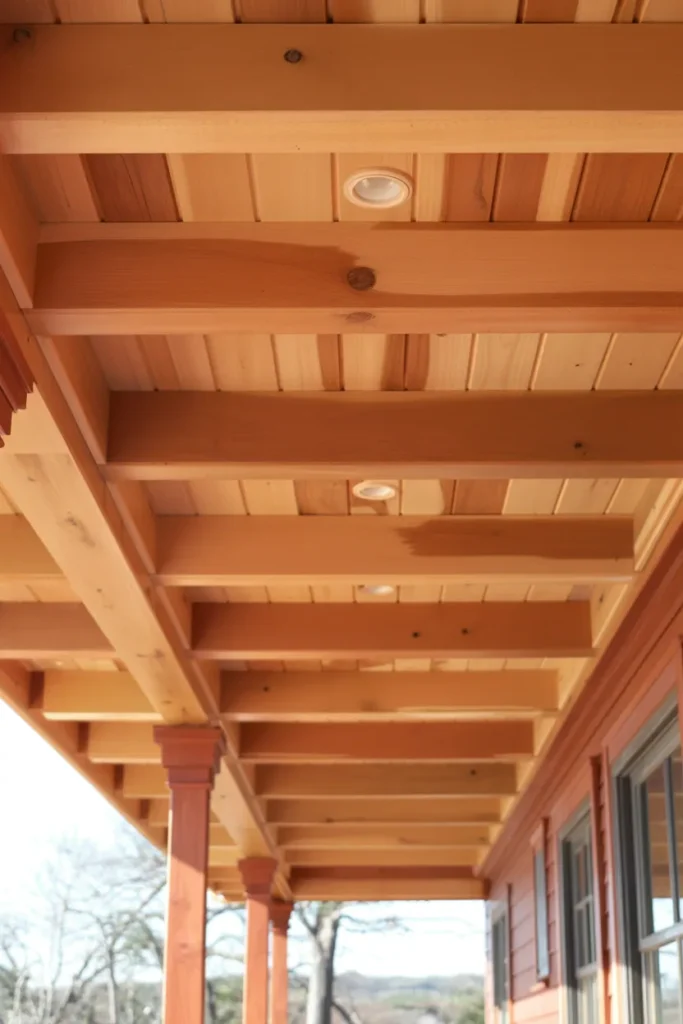
Nothing beats the natural beauty of Western Red Cedar. You seal it with a clear coat varnish to let those rich red and brown tones pop. I love how this wood naturally resists rot and insects which makes it perfect for outdoor use.
The variation in color between the boards creates a stunning visual texture that feels high end and expensive. Cedar brings an instant warmth that makes large spaces feel cozy. You do not need to stain this wood to make it look good. The natural grain does all the heavy lifting for you.
Just make sure you apply a UV resistant sealer or the sun will turn your beautiful red ceiling gray within a year or two. IMO this is the gold standard for a traditional porch look. It smells amazing too.
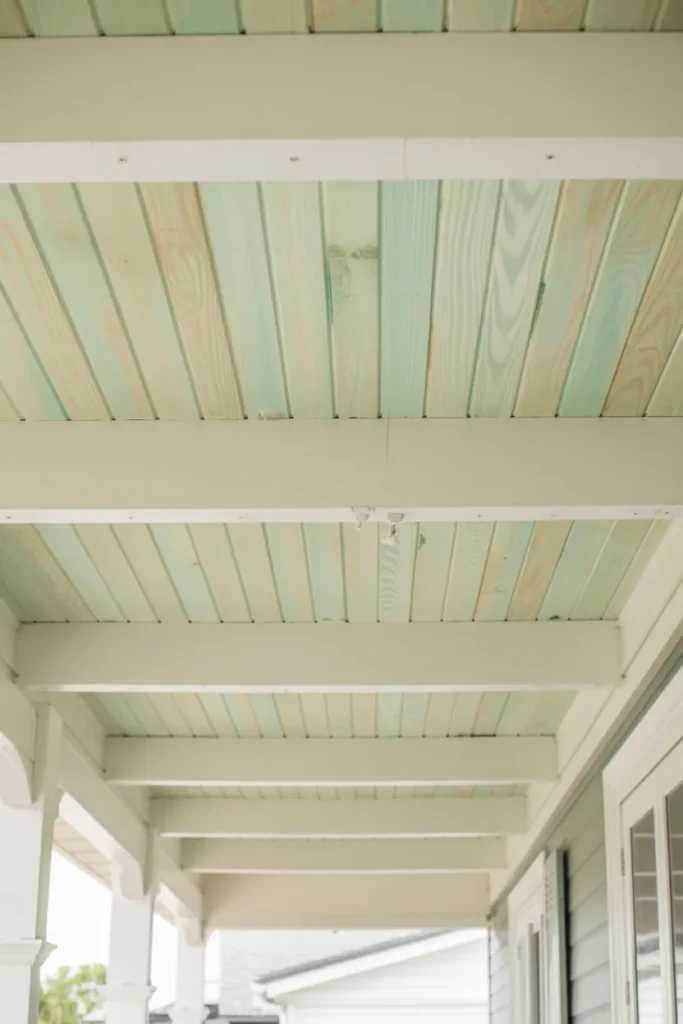
2. The Southern Haint Blue
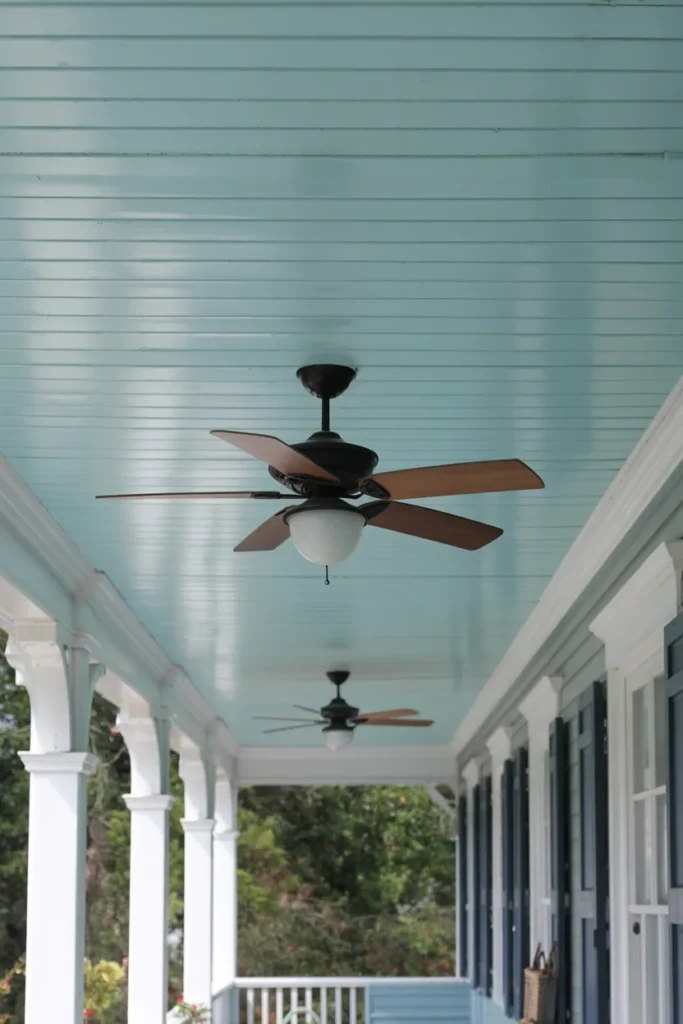
Have you ever wondered why so many porches in the South have blue ceilings? Folklore says this specific shade of soft blue green wards off evil spirits or “haints”. Even if you do not believe in ghosts Haint Blue looks incredible on a tongue and groove ceiling porch.
It tricks the eye into thinking the sky extends right into your covered area. This color makes the ceiling feel higher and the space feel airier. I honestly think this is the most charming option on this list. It pairs perfectly with white columns and a glass of sweet tea.
Some people also claim the blue color discourages wasps and spiders from building nests because they mistake it for the sky. Who knows if that is true but I am willing to try anything to keep bugs away.
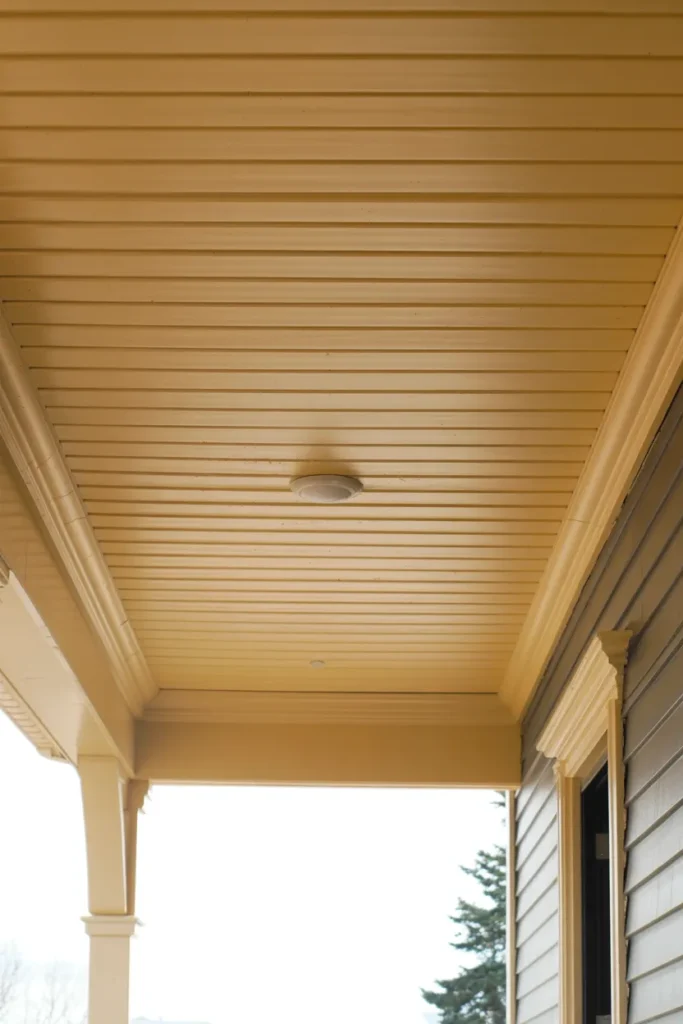
3. Crisp White Farmhouse
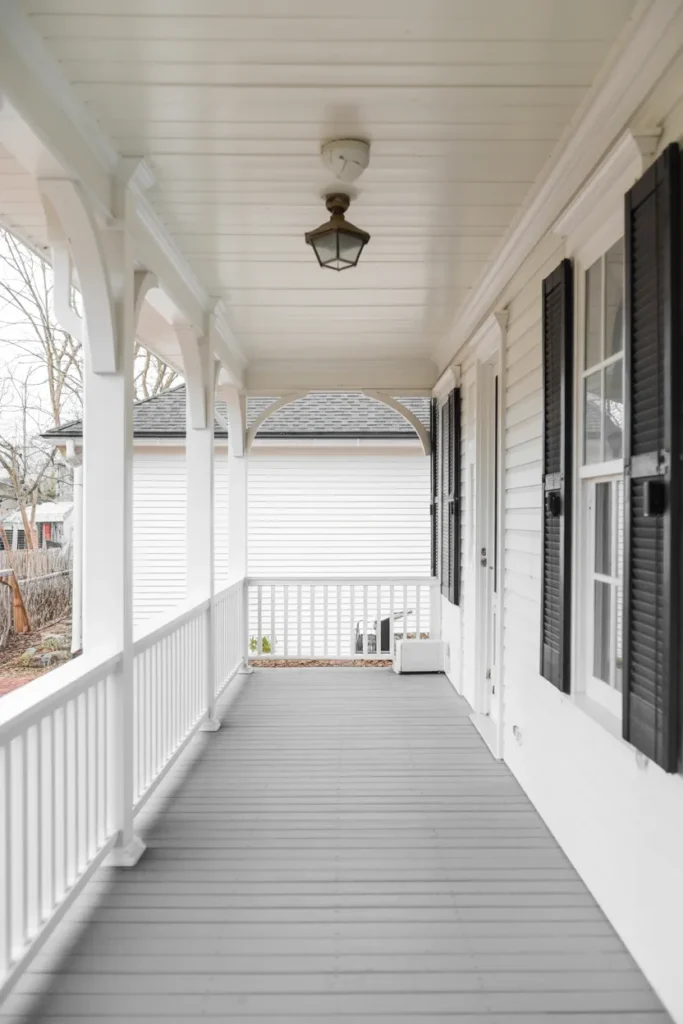
You cannot go wrong with a classic coat of white paint. Painting your tongue and groove ceiling porch white reflects light and makes the entire area feel bright and clean. This is the go to move for the modern farmhouse aesthetic that everyone loves right now.
It creates a seamless transition from your interior siding to your exterior living space. White paint also hides imperfections in the wood better than stain does. I recommend using a satin or semi gloss finish rather than flat paint.
The slight sheen helps bounce light around and makes cleaning up spiderwebs way easier. If your porch feels small or dark this is absolutely the best way to open it up. Just be prepared to pressure wash it occasionally to keep it looking fresh.
4. Dark and Moody Charcoal
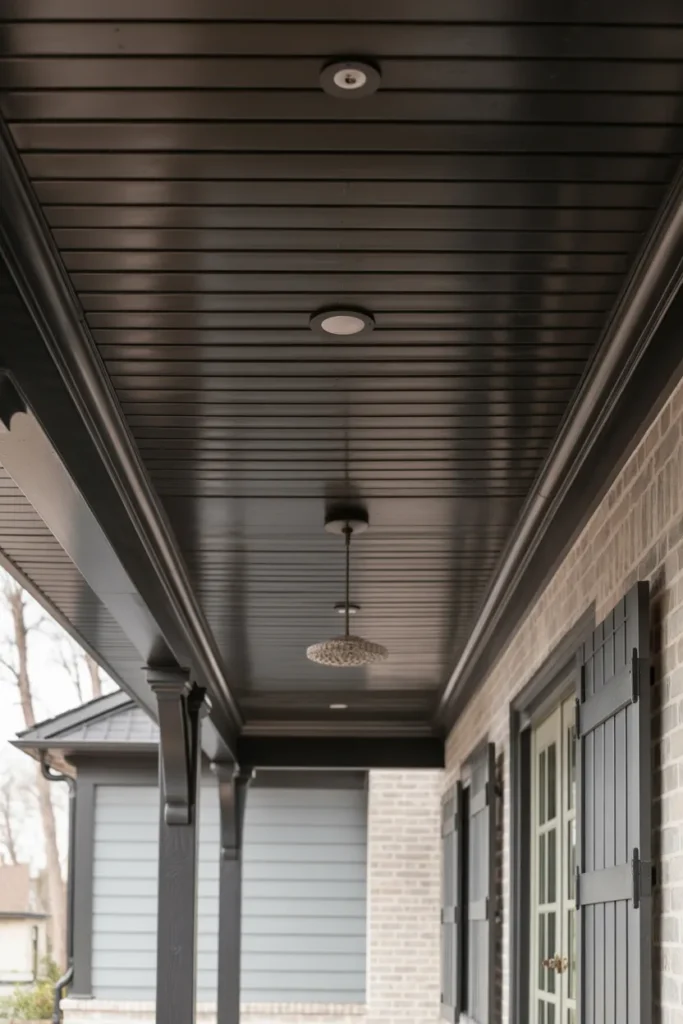
Do you want to bring some drama to your outdoor space? Paint your tongue and groove boards in a deep charcoal or even matte black. This creates a striking contrast against light siding or brick walls.
A dark ceiling actually makes the ceiling recede visually which can make the space feel infinite and cozy at the same time. It looks incredibly sophisticated and modern.
I saw this done on a mid century modern home recently and my jaw hit the floor. It completely changes the vibe from casual to upscale lounge.
Add some recessed lighting or a statement chandelier and you have a showstopper. Just make sure your porch gets enough natural light so it does not feel like a cave.
5. Rustic Reclaimed Wood
Using reclaimed barn wood gives your porch instant history and texture. The weathered grays and browns tell a story that brand new lumber just cannot match.
You get knots and nail holes and saw marks that add serious character to your tongue and groove ceiling porch. This style works perfectly for cabins or rustic lake houses.
Finding enough matching reclaimed wood can be a hassle but the result is worth the hunt. You typically leave this wood unfinished to maintain that raw and rugged look.
Just make sure you check the wood for pests before you install it. You do not want to invite termites to your house renovation party.
6. The Herringbone Pattern
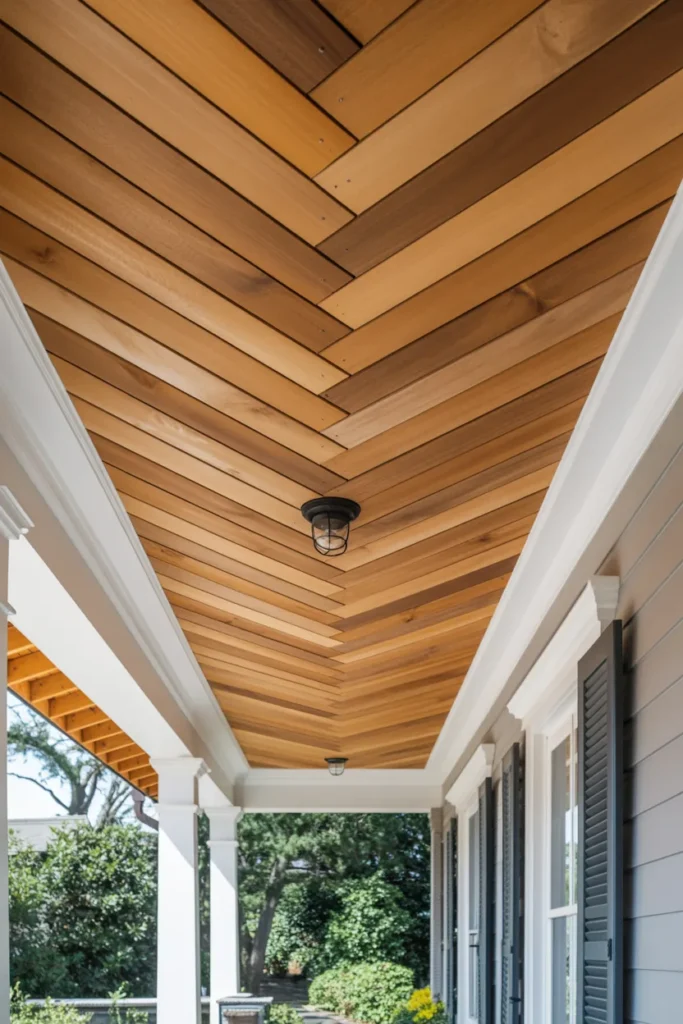
Why settle for straight lines when you can create art? Installing your boards in a herringbone pattern adds a massive dose of luxury and craftsmanship to the ceiling.
This requires way more cuts and creates more waste but the visual impact is undeniable. Herringbone draws the eye up and creates a focal point that serves as a conversation starter.
I will be honest with you. This is not a project for a beginner DIYer. You need precise angles and a lot of patience to get this right.
But if you have the budget to hire a pro or the skills to do it yourself it elevates the entire home. It looks particularly amazing in square or rectangular porch sections.
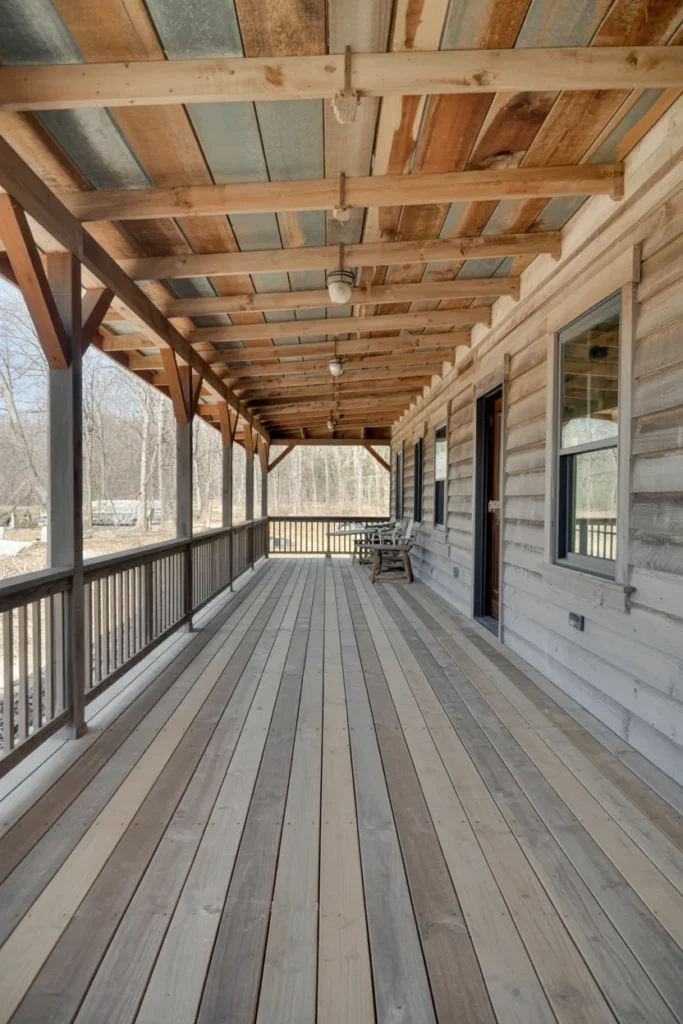
7. Exposed Rafters and Beams
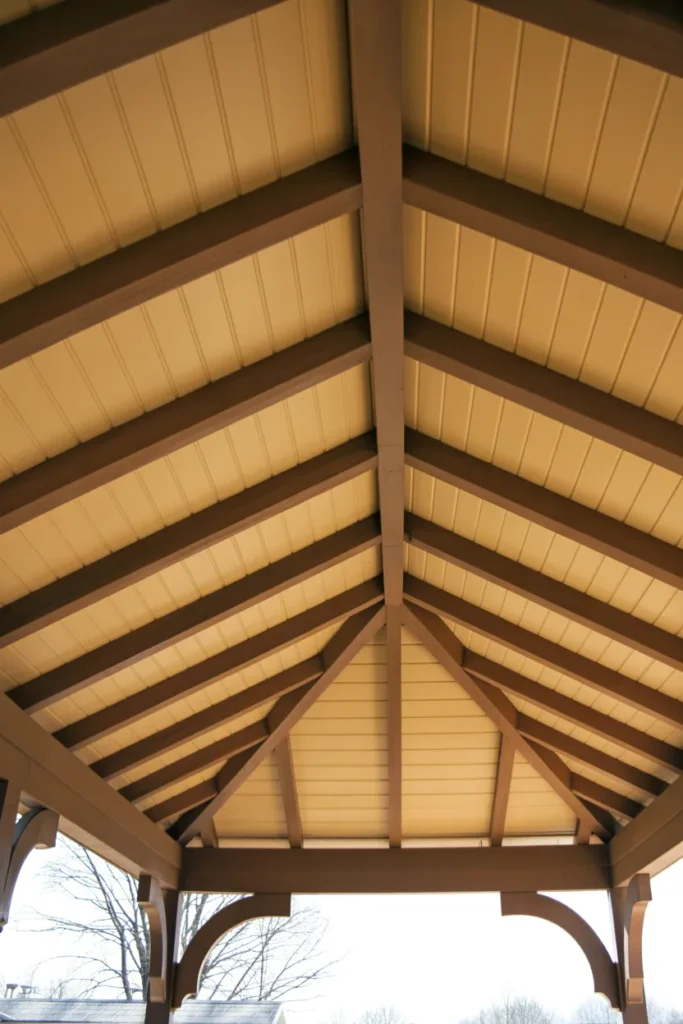
You can install your tongue and groove boards on top of exposed rafters rather than hiding them. This creates a coffered look or a cathedral ceiling effect that feels grand and spacious.
Painting the flat boards white while staining the beams a dark color creates a stunning two tone contrast. This adds depth and architectural interest that a flat ceiling lacks.
This style reminds me of classic craftsman homes. It highlights the structure of the house rather than covering it up. You do need to plan this out during the framing stage though.
If your existing porch already has a flat plywood ceiling you might have to add faux beams to achieve this look. FYI faux beams are much lighter and easier to install anyway.
8. Vertical Installation Lines
Most people run their ceiling boards parallel to the house wall. Why not switch it up? Running the boards perpendicular to the house draws the eye outward toward the yard or the view.
This subtle change can make a shallow porch feel deeper than it actually is. Directional installation is a clever designer trick that costs zero extra dollars.
You just need to make sure your joist framing supports this direction. Sometimes you have to install blocking to have something to nail into.
I love how this leads your gaze out to the landscape. It creates a nice flow from the indoors to the outdoors. It is a small detail that makes a big subconscious difference.
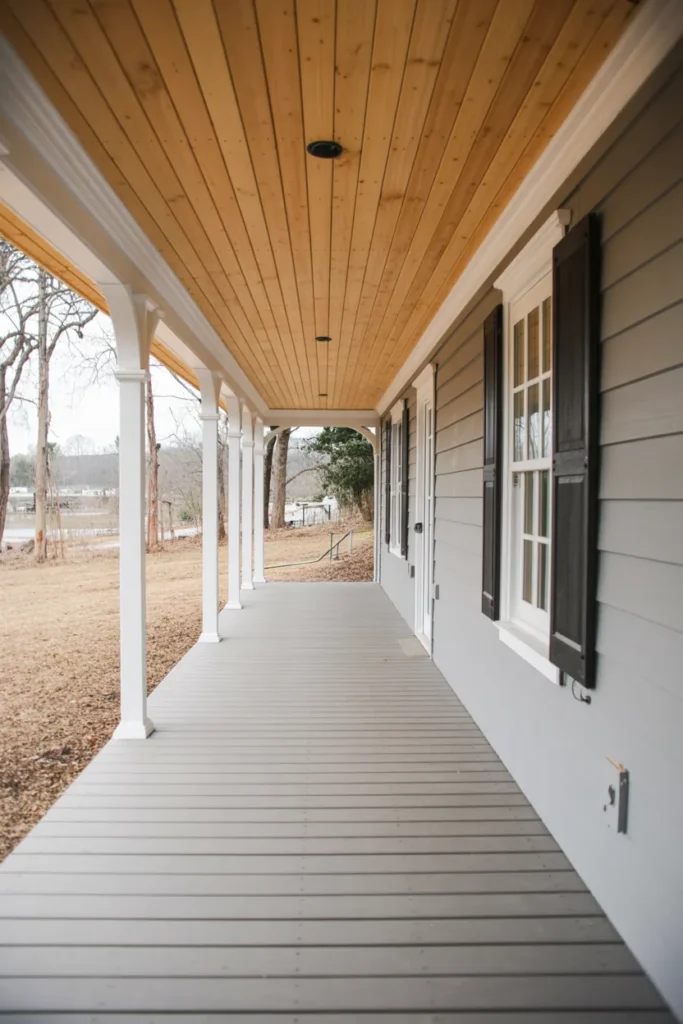
9. Wide Plank Knotty Pine
If you want that cozy lodge feeling you need wide plank knotty pine. The wider boards show off more of the wood grain and the distinctive knots that give pine its character.
Knotty pine is usually cheaper than cedar which makes it a great budget friendly option for covering large areas. It yellows slightly over time which adds to that vintage golden glow.
I grew up in a house with a pine porch so this look makes me super nostalgic. You should seal this with a polyurethane or spar varnish to protect it from humidity.
The knots can sometimes bleed sap so using a specialized primer is smart if you ever decide to paint over it. But honestly why would you cover up all that beautiful texture?
10. The Pickled or Whitewashed Look
Do you love the brightness of white paint but miss the texture of wood grain? Whitewashing or pickling your tongue and groove is the perfect middle ground.
You water down white paint and wipe it onto the wood so the grain shows through the color. This gives you a coastal vibe that looks breezy and relaxed.
This finish looks fantastic on pine because it tones down the yellowing while keeping the rustic feel. It is very forgiving to apply so you can mess up a little and it still looks intentional.
I think this is the best option for a beach house or a cottage. It feels light and airy without looking too sterile.
11. High Gloss Yacht Style

Channel your inner billionaire by finishing your wood ceiling with high gloss marine varnish. This creates a mirror like finish that reflects light and looks like the deck of a luxury wooden boat.
High gloss varnish highlights every detail in the grain and makes the wood look rich and deep. It is incredibly durable against moisture and salt air.
This is a labor of love because you need to sand between multiple coats to get that glass like surface. But the payoff is huge. It screams luxury and attention to detail.
I would use a high quality mahogany or teak for this to really sell the yacht aesthetic. It is a flex but a very stylish one.
12. Picture Frame Border
You can add definition to your ceiling by installing a border around the perimeter. You run boards parallel to the walls for the outer edge and then fill the center with a perpendicular or diagonal pattern.
This picture frame effect makes the ceiling look like a deliberate design element rather than just a covering. It creates a polished and finished look.
This is a great way to handle awkward cuts at the edges of the room. Instead of having a tiny sliver of board at the wall you have a nice wide border board.
It takes a bit more planning but the professional result is worth it. It adds a level of sophistication that plain parallel boards lack.
13. Modern Clear Grade Fir

If you dislike knots and rustic texture go for clear grade Douglas Fir. This wood has a very straight and tight grain pattern with a reddish orange hue. It looks incredibly modern and sleek.
Clear grade fir is perfect for mid century modern or contemporary homes where clean lines are king. It looks very architectural and precise.
You pay a premium for wood without knots but it creates a very calm and uniform surface. I find that busy wood grain can sometimes clutter a space visually.
Fir keeps things simple and elegant. Seal it with a clear matte sealer to keep it looking natural and understated.
14. The Driftwood Grey Stain
You can achieve the look of aged wood without using old rotting boards. Gray stain mimics the look of driftwood that has been bleached by the sun and sea.
This cool toned stain works well with modern color palettes that lean towards greys and blues. It takes the yellow and red tones out of pine or cedar.
I used this on a project recently and it looked amazing against black metal railings. It feels organic but contemporary.
You get the texture of wood without the warmth that might clash with a cool color scheme. Plus it hides dust and dirt really well which is a huge bonus for outdoor spaces.
15. Continuous Floor to Ceiling

Blur the lines between surfaces by using the same wood on your floor and your ceiling. This creates a wrapping effect that feels very cozy and enclosed.
It creates a strong connection between the two planes and makes the porch feel like a unified room. Matching surfaces is a bold design choice that feels very custom.
You usually want to choose a durable hardwood like Ipe or Cumaru for this if you are using the exact same boards. The rich color creates a jewel box effect.
It is intense but in the best way possible. Just break it up with some lighter furniture so the space does not feel too heavy or dark.
How to Install A Tongue and Groove Ceiling Porch
You have picked your style and now you need to get it up on the ceiling. This is not just about nailing boards up and hoping for the best. Exterior wood needs special love.
Here is exactly how I would tackle this project to make sure it lasts.
1. Choose the Right Wood
You need wood that can handle the outdoors. Pine is affordable and paints well but rots if you do not seal it perfectly.
Cedar and Cypress naturally resist rot and insects which makes them the premium choice for clear finishes. You can also buy PVC tongue and groove which never rots but lacks the natural feel of real wood.
2. Acclimation is Non Negotiable
This is the step everyone skips and they always regret it. You must let your wood sit in the installation area for 5 to 7 days before you install it.
Wood swells and shrinks with humidity. If you install bone dry wood outside in July it will swell and buckle your ceiling within a week. Let it adjust to the moisture in the air first.
3. Seal All Sides
You cannot just paint the face of the board. You need to back prime or seal the back and edges of every single board before it goes up.
If you seal only one side the board absorbs moisture unevenly and cups like a potato chip. I know it is a pain to paint the back where no one sees it but you have to do it.
4. Nailing it Up
You should use a brad nailer to blind nail the boards. This means you drive the nail through the tongue of the board at a 45 degree angle.
The next board slides over the tongue and hides the nail head. This gives you a clean look with zero visible fasteners.
Use stainless steel or hot dipped galvanized nails so they do not rust and streak your beautiful ceiling.
5. Leave Room to Move
Wood is a living thing that expands and contracts. Do not jam the boards together as tight as humanly possible. Fit them together snugly but leave a tiny bit of breathing room in the groove.
You also need to leave a gap of about 1/2 inch around the perimeter of the ceiling to allow for expansion. You cover this gap with molding later.
FAQs
Elevate Your Outdoor Space with a New Ceiling
Upgrading your porch ceiling is one of the most rewarding projects you can tackle. It completely changes the atmosphere of your outdoor space from a basic builder structure to a custom designed sanctuary. Whether you choose the ghost fighting powers of Haint Blue or the warm luxury of clear cedar you are adding massive value to your home.
Take your time with the installation and do not skip the acclimation step. Seriously I cannot stress that enough. Get out there and look up. Your porch ceiling is begging for a makeover. Grab your hammer and make it happen.

I am Mindy Medford, a home décor, paint, and design specialist with over a decade of hands-on experience transforming ordinary spaces into cozy, personality-packed havens. Since 2013, I have been helping homeowners discover the art of beautiful yet practical design. I share my love for color, texture, and layout—making stylish interiors & exteriors feel achievable for everyone. Whether it’s picking the perfect paint shade or reimagining a small space, I’m here to guide and inspire.