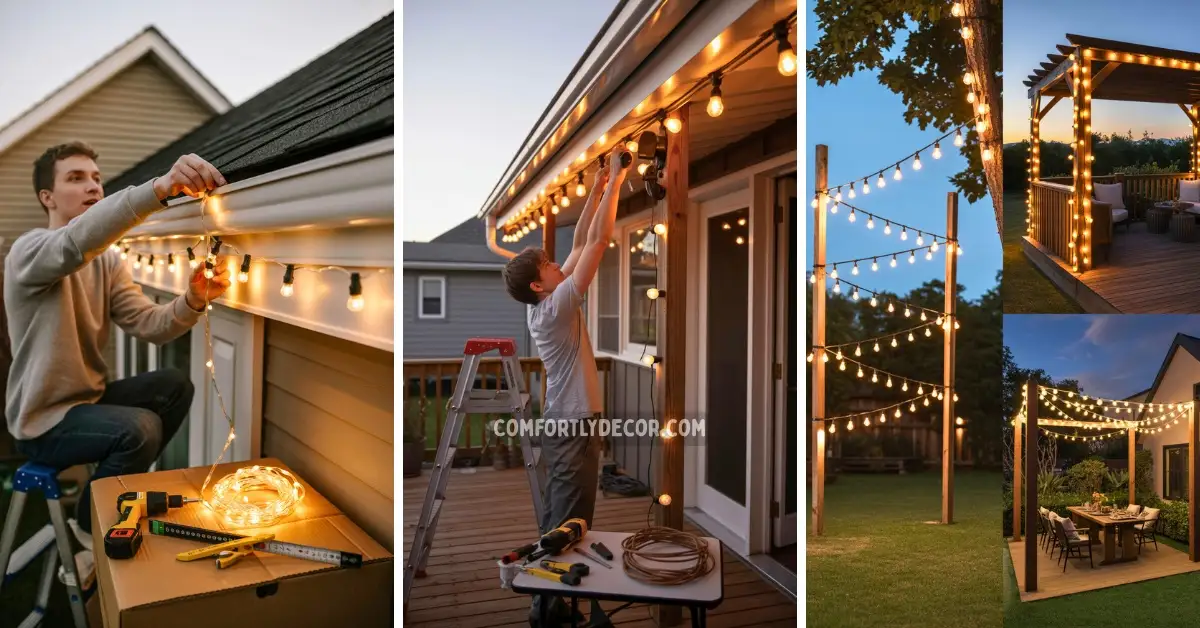
How to Hang Outdoor String Lights: A Simple Guide
Few things set the mood outdoors like glowing string lights. Seriously, they are the fairy godmothers of backyard ambiance. But hanging them? That can feel like wrestling an octopus if you do not know what you are doing. I have seen some truly questionable setups in my day. Let’s just say duct tape and hope are not a solid strategy.
I am here to teach you how to hang outdoor string lights safely and stylishly, so you can spend less time untangling cords and more time enjoying your newly magical outdoor space.
First, Decide on Your Vibe
Before you even touch a light strand, you need a plan. What’s the look you’re going for? A little planning now saves a lot of headache later. Trust me.
The Zig-Zag or Café Style
This is that classic, charming look you see at trendy outdoor cafes. You crisscross the lights over a patio or seating area, creating a scattered, starry effect. It’s fantastic for broad, open spaces where you want even light distribution.
Perimeter Framing
This one’s pretty straightforward. You outline a specific area, like a deck, fence, or the eaves of your house. It’s a clean, defined look that works wonders for highlighting the architecture of your space. It basically says, “This is the cool zone.”
The Canopy Look
Feeling ambitious? A canopy or crisscross design creates a literal ceiling of light. You run strands back and forth in a tight grid pattern. It’s a showstopper and makes any space feel incredibly intimate and special. It’s a bit more work, but the payoff is huge.
Gather Your Gear
Alright, you’ve got a vision. Now you need the right tools. Using indoor stuff outside is a recipe for disaster, so don’t even think about it.
Here’s your shopping list:
- Outdoor-Rated String Lights: This is non-negotiable. Check the box for “outdoor use.” They’re built to withstand rain and sun without shorting out.
- Outdoor-Rated Extension Cords: Again, outdoor-rated is the keyword here. You need cords designed to handle the elements.
- Mounting Hardware: Depending on your plan, this could mean screw-in hooks, zip ties, or guide wires. I’ll get into this more in a second.
- Measuring Tape: Don’t eyeball it. Just… don’t.
- A Ladder: Unless you’re secretly 8 feet tall.
Time to Hang ‘Em Up
This is where the magic happens. Take a deep breath, maybe put on some good music, and let’s get to it.
Step 1: Measure Everything
Measure the space you plan to light. Then, add a little extra length to your measurement to account for some slack or “drape” in the lights. A taut line looks weird and puts stress on the cord. Aim for a gentle swoop.
Step 2: Secure Your Anchor Points
Your lights need something to hang from. This could be the side of your house, a sturdy tree, or a fence post.
- On Walls: Use screw-in hooks. Drill a pilot hole first to make your life easier.
- On Trees: Please, for the love of all that is green, do not nail anything into trees. It hurts them! Use a loosely fastened zip tie or a hook that you can easily remove later.
- No Anchor Points? If you’re in an open area, you can create your own anchor points. Use sturdy metal poles secured in buckets of concrete or planters filled with gravel.
Step 3: Start Hanging
Start at the end closest to your power source and work your way out. Use S-hooks, clips, or zip ties to attach the light strand to your anchor points. If you have a long span (more than 15-20 feet) between anchor points, I highly recommend using a guide wire. A thin steel cable stretched between your anchors will prevent sagging and take the tension off the light cord itself.
Step 4: Connect Safely
Plug your lights into an outdoor-rated extension cord, and then plug that cord into a GFCI (Ground Fault Circuit Interrupter) outlet. This is a special outlet that shuts off the power if it detects a problem, which is crucial for preventing shocks in wet conditions.
Safety First, Ambiance Second
Look, I want your patio to look amazing, but I also want you to not get electrocuted or start a fire. So, let’s go over a few safety rules.
- GFCI Outlets Are Your Best Friend: I mentioned this already, but it’s important enough to repeat. If you don’t have one, hire an electrician to install one. It’s worth it.
- Weatherproof Your Connections: Wrap any connection points between cords with electrical tape or use specially designed weatherproof connector covers. Water and electricity are not friends.
- Mind the Storms: If you know a massive storm with high winds is coming, you might want to consider taking your lights down. It’s a pain, but it’s better than finding them in your neighbor’s yard.
Feeling a Little Extra?
You’ve mastered the basics. Ready to level up your outdoor lighting ideas?
- Layer Your Lights: Don’t stop at string lights! Mix in some solar-powered lanterns on the ground or delicate fairy lights wrapped around a tree trunk. The more layers, the more depth and visual interest you create.
- Go Solar: If you don’t have easy access to an outlet, solar-powered string lights are a game-changer. They’ve gotten so much better over the years, and you can’t beat the convenience. IMO, they’re perfect for smaller spaces or accent areas.
Now, Go Make Some Magic
There you have it. You’re now equipped with the knowledge to hang outdoor string lights without causing a neighborhood blackout. It’s one of the easiest and most impactful DIY projects you can tackle. The right lighting transforms a boring patio into an enchanting escape, perfect for late-night chats or quiet evenings alone. So go on, get out there and create your own little slice of paradise.
FAQs

I am Mindy Medford, a home décor, paint, and design specialist with over a decade of hands-on experience transforming ordinary spaces into cozy, personality-packed havens. Since 2013, I have been helping homeowners discover the art of beautiful yet practical design. I share my love for color, texture, and layout—making stylish interiors & exteriors feel achievable for everyone. Whether it’s picking the perfect paint shade or reimagining a small space, I’m here to guide and inspire.
